About D2L Brightspace
D2L Brightspace is our online learning platform for Motlow State. Every course that is offered at Motlow has a corresponding D2L course site.
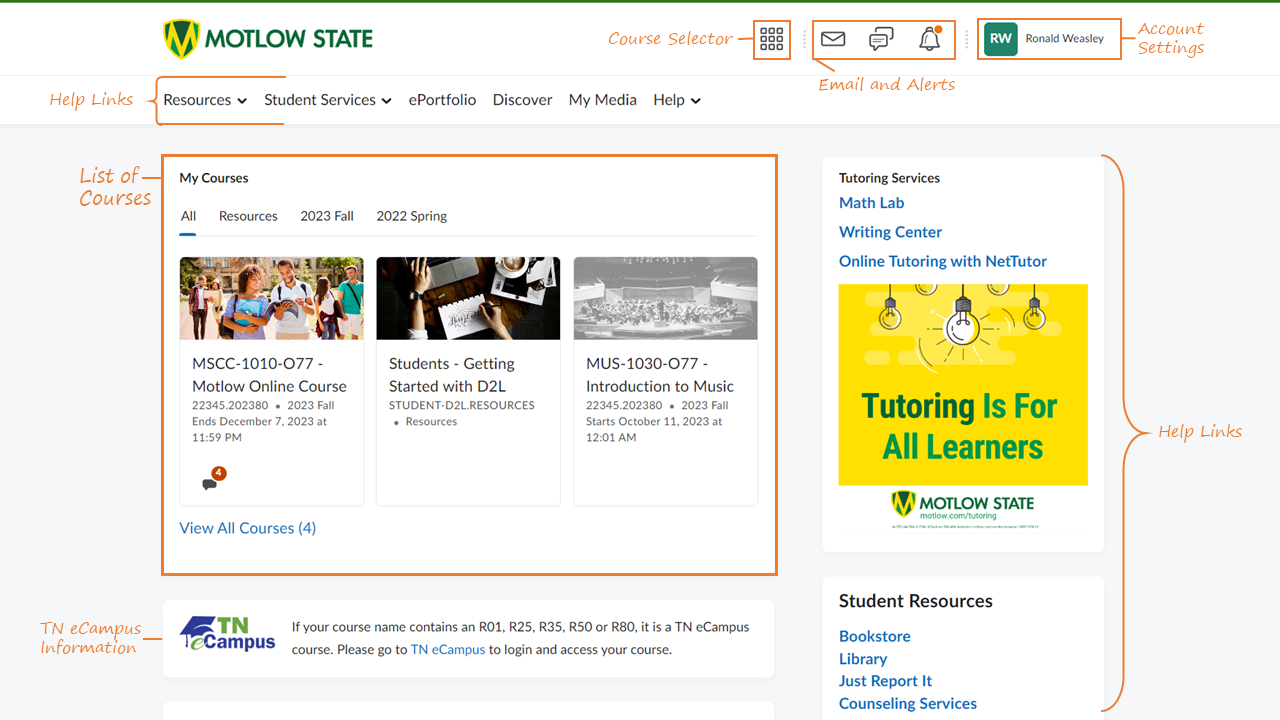
D2L Homepage
After you login, the first page you come to is the homepage of D2L. Here you'll find a listing of courses that are available to you, as well as listings of help information. Take a look at the image below to get an idea of the features of the D2L homepage.
How to create a content module
Organize your course materials by creating content modules. Think of these modules as “folders” that can group together files and D2L activities (such as Assignments, Discussions, or Quizzes).
![]() How to create a content module
How to create a content module
- In your D2L course, click on Content.
- Under the “Table of Contents” area on the left side of the screen, click on Add a Module…
- Type a name for the module (e.g. Module 1, Chapter 7 or Week Three) and then press the Enter (or Return) key on your keyboard.
- The module will be created. Optionally, set the following settings for the new module:
- You may add date restrictions to this module. (Start and End dates will determine when the module is visible to the student.)
- You may create a release condition for the module information. (Release conditions determine if a task should be completed before this module is visible to students.)
- Lastly, you can add a description for the module to aid students in understanding the content or assignments you have included.
NOTE: It is recommended that modules be developed as if you were creating a lesson plan. Consider all of the elements -- including assessments and supporting documents -- that are needed in order for students to successfully complete that lesson, and place them within the module.
How to delete a module
Note: Deleting a module deletes all topics within that module.
-
On the navbar, click on Course Materials and select Content.
-
In the Table of Contents panel, click the module or topic you want to delete.
-
If you are deleting a module, click Delete Module from the module's context menu. If you are deleting a topic, click Delete Topic from the topic's context menu.
-
Decide whether you want to remove the module or topic from the Content view only or permanently delete the module or topic from the course (this will also delete all associated objects including discussions, quizzes, etc).
-
Click Delete.
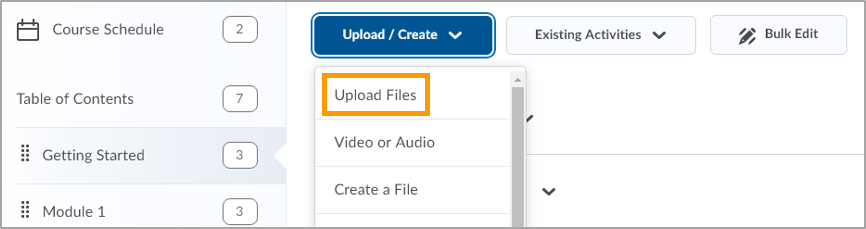
How to upload file to a content module
-
In your D2L course, click on Course Materials and select Content.
-
Click on the content module where you want to add the file.
-
Click the blue Upload/Create button.
-
Choose whether you’re uploading a file from My Computer or Course Offering Files (if it has been uploaded to this D2L course before).
-
Click the Upload button to locate the file OR drag the file to the dotted rectangle.
-
When you see the filename listed within the "Add a File" window, click the blue Add button.
How to create a file for a content module
Webpage files can be created within the Content area.
- In your D2L course, go to the content module where you want to add the file.
- Click on Content on the course navigation (navbar).
- Click on the content module name or click on “Add a Module…” to create a new content module.
- Click the blue Upload/Create button.
- Choose the Create a File option from the drop-down menu.
-
Click the blue Upload/Create button.
-
Choose whether you’re uploading a file from My Computer or Course Offering Files (if it has been uploaded to this D2L course before).
-
Click the Upload button to locate the file OR drag the file to the dotted rectangle.
-
When you see the filename listed within the "Add a File" window, click the blue Add button.
How to create, edit and delete an announcement
Announcements allow you to post information and instructions to your students. Think of this space as you speaking to the whole class in the classroom.
Create an announcement
-
Click on a D2L course. You will be taken to the course home page.
-
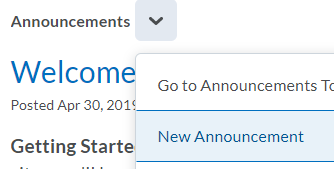
Click the drop-down arrow to the right of Announcements.
-
Select the option New Announcement.
-
Enter a Headline for the announcement.
-
(Optional) Check the option to "Display Author Information."
-
Use the Content text area to compose the message to students.
-
Set the Start and End Dates for the announcement. (These dates determine when the announcement is visible to students.)
-
(Optional) Add attachments or release conditions for this specific announcement.
-
Click the blue Publish button to post the announcement.
The "Save as Draft" option will save the announcement, but leave it in a draft state. The announcement will need to be published in order to be displayed to students.
Edit or delete an announcement
-
Click the drop-down arrow to the right of the announcement title
-
Select Delete or Edit.

NOTE: Selecting the "X" in the upper right corner of an announcement will only dismiss the announcement from your view. Your students can still see this announcement until it is either deleted or expired past your end date setting.
About Assignments
The assignments tool allows students to turn in work directly to the instructor. Assignments eliminate the need for student work to be submitted physically in-person, or through mail, fax, and email methods. As an instructor, the assignment designates a specific area to collect, keep track of, and evaluate student work.
IMPORTANT: Previously, D2L assignments were known as "Dropbox folders" or simply "Dropbox." However, this term is no longer utilized by the platform.
What file types can students submit to assignments?
For file submission type assignments, students can submit the following files:
Text documents:
- Word (.doc, .docx),
- Rich Text Format (.rtf),
- PowerPoint (.ppt, .pps, .pptx, .ppsx),
- Excel (.xls, .xlsx),
- Text (.txt),
- OpenDocument (.odt, .odp)
Image files:
- .jpg, .jpeg,
- .png,
- .tif, .tiff
Note: Files created using the Apple program Pages (.pages) can be submitted to an assignment, but will not display in the Assignments document viewer when the instructor is ready to evaluate. It is recommended that students export (save) Pages files as either a Word or PDF file before submitting.
IMPORTANT: Students need to be sure their file name does not contain special characters (such as ” * / : % # $ @ ! < > ? \ | –).
Please know that if the name of the file contains a special character, students may see an error message that states, "Oops, your file could not be uploaded." If this error occurs, please have the student change the name of the file to only contain letters and numbers, followed by the file extension (i.e. ".docx" or ".pdf").
How to create an assignment
- In your D2L course, click on Assignments on the course navigation (navbar).
-
Click the blue New Assignment button.
-
Enter a Name for the assignment.
-
If the assignment is for a numerical grade, enter a points value in the Grade Out Of field.
Note: the status will change from “Ungraded” as soon as you click on the box.-
After you enter the total amount of points for this assignment, a corresponding grade item (a column in Grades) will be created at the same time.
-
If you need to link this assignment to an existing grade item, set it to not appear in Grades, OR change the assignment back to ungraded, click on In Grade Book for these options.
-
-
Enter a Due Date for this assignment.
Note: students will be able to submit to this assignment after the due date with a “late” designation. -
Enter Instructions for this assignment in the provided text area.
-
On the right-hand side, click on the Availability Dates & Conditions area to expand.
-
Enter the Start Date and End Date for the assignment. These dates determine the window of time students can submit.
-
If needed, specify any Release Conditions or Special Access for this assignment.
-
On the right-hand side, click on the Submission & Completion area to expand.
-
Select an Assignment Type: Individual assignment or Group assignment
-
Select a Submission type:
-
For File submissions, set the number of Files Allowed Per Submission and the Submission rules.
-
For Text submissions, set the Submission rules.
-
For On paper submission, set Marked as completed to one of the available options: Manually by learners, Automatically on evaluation, or Automatically on due date.
-
For Observed in person assignments, set Marked as completed to one of the available options: Manually by learners, Automatically on evaluation, or Automatically on due date.
-
-
On the right-hand side, click on the Evaluation & Feedback area to expand.
-
To associate a rubric to the assignment, click Add Rubric. You have the options to Create New or Add Existing D2L rubrics to this assignment.
-
Click the Manage Turnitin setting to enable the Similarity Report and Online Grading features of Turnitin for this assignment if it is a file submission. (Do not enable Turnitin if students are submitting a D2L ePortfolio presentation.)
-
-
When ready, click Save and Close to finish creating the assignment.
How to add special access to an assignment
How to create a discussion forum or topic
Discussions are a great tool to use to have students talking about a subject matter together.
The following steps demonstrate how to create a discussion forum or topic. Keep in mind that a forum is a way to group one or more topics. Every discussion topic must be associated with a forum.
-
In your D2L course, click on Discussions on the course navigation (navbar).
-
Click on the blue New button
-
Select either New Forum or New Topic
-
Enter the Title, Description, and availability Start / End dates
-
Select the Display in Calendar option
-
If it is a new forum then select Save and Add Topic to complete the topic setup form
-
On the "Assessment" tab for a topic, select or create a New Grade Item and enter the Score out of input
How to create a quiz
The Quizzes tool enables you to create and manage points-measured tests. A quiz can be a timed assessment that includes multiple-choice, true or false, matching, fill-in-the-blank, and/or written response (essay) type questions.
How to add accommodations and special access to a quiz
At times it may be necessary to grant one or more students a different set of parameters for a quiz than the other students in the class. The following steps will walk you through setting those quiz parameters.
EXAMPLE: The instructor is notified that a student has registered with the Office of Disability Services and needs extended time on a test. In this scenario, the time for all quizzes can be adjusted at once through the D2L Classlist.
How to add time accommodations to all quizzes for one student
- In your D2L course, click on Tools.
- Select Classlist.
- Locate the student needing time accommodations. Click to the right of the student's name and select Edit Accommodations on the drop-down menu.
EXAMPLE: A student was unable to take the quiz and the instructor is allowing the student to take the quiz at a later date. In this scenario, editing the quiz to set "special access" will allow the quiz to be available to the specific student.
How to add special access to an individual quiz
-
In your course, click on Quizzes.
-
Click on the name of the quiz to which you'll be giving special access.
-
Expand the Availability Dates & Conditions section on the right-hand side.
-
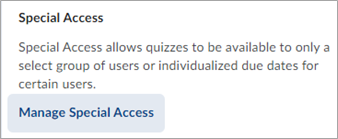
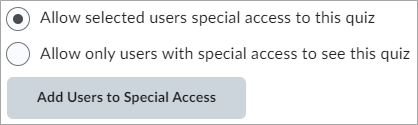
Click on the Manage Special Access link.
-
Make sure the "Allow selected users special access to this quiz" button is selected (this is the default option.)
-
Click the Add Users to Special Access button.
-
Set the special access that you want to grant (i.e. adjust the availability dates).
If needed, you also have the options to adjust the timing and the number of attempts. -
Scroll down and check the box next to the name of the student(s) who will have special access to the quiz.
-
Click the Save button at the bottom of the screen.
-
You'll return to the Special Access page. Verify that the student(s) has now been listed with the updated quiz settings.
-
Click the Save and Close button.
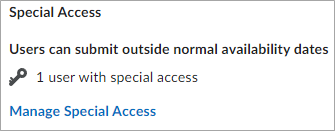
-
You'll return to editing the quiz. Notice the new indication that a user (or users) can submit outside of normal availability dates.
-
Click the Save and Close button to save your changes.
How to setup your gradebook
The Grades Setup Wizard will walk you step-by-step through the process of setting up your gradebook.
- In your D2L course, click on Grades on the course navigation (navbar).
- Click the Setup Wizard option (if you are not automatically taken there).

- Review the current settings. Then, scroll down and click the blue Start button.
- Step 1 of 7: Select between a “Weighted” grading scale or a “Points” grading scale.
Keep in mind that you will designate the weight percentages or the point values when you create your grade items and categories. - When ready, click the blue Continue button.
- Step 2 of 7: Select whether you will release the “Calculated Final Grade” or the “Adjusted Final Grade” to students.
- You can also choose to “Automatically release final grade” to students.
- When ready, click the blue Continue button.
- Step 3 of 7: Select to either “Drop ungraded items” or “Treat ungraded items as 0 (zero).”
IMPORTANT:
If you choose “Drop ungraded items,” be sure to enter zeros (0) for those students who do not earn a grade for a specific grade item. With this setting enabled, D2L will not include any “blank” grade items in the grade calculation. - When ready, click the blue Continue button.
- Step 4 of 7: Choose the Default Grade Scheme.
“Percentage” is the default grade scheme and will be the only one listed unless you create an additional grade scheme. - When ready, click the blue Continue button.
- Step 5 of 7: Designate the number of decimals places to display to you the instructor.
The default value is 2. - When ready, click the blue Continue button.
- Step 6 of 7: Student View Display Options.
On this step, you can designate the settings for when students view their grades.- Points grade: Determines if students see the point value earned for a grade item.
- Weighted grade: Determines if students see the weighted percentage value for a grade item. (Option only available if a Weighted grading scale was chosen in Step 1.)
- Grade scheme symbol: Determines if students see the percentage value of a grade item. (For instance, if a student earned 90 out of 100, the student would see 90%.)
- Grade scheme color: Determines if students see a grade item’s color associated with the grade scheme.
- Decimals Displayed: You can decide how many decimals to show the students.
- Characters Displayed: If using a “Text grade item,” set the number of characters to display for students.
- Final Grade Calculation: Determines whether or not students can view how the final grade was calculated.
- When ready, click the blue Continue button.
- Step 7 of 7: Summary. Review the settings you chose, then scroll down and click the blue Finish button when ready.
- After completing the Setup Wizard, you will then be directed to create grade items and categories.
How to create a grade item
- If you have just finished completing the Setup Wizard, click the link to Create a New Grade Item.
– OR –
Within the Grades area, click the option Manage Grades, then select the blue New button and choose Item.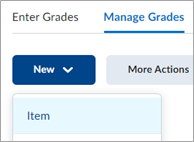
- Next, choose the type of grade item to create. The majority of the time you will be selecting “Numeric.”
- Numeric – for when assigning a value out of a specified total (e.g., 25/30 points).
- Selectbox – use this option to assign a letter grade (A-F) or Complete/Incomplete grade scheme.
- Pass/Fail – the best choice for when you’re using a simple pass/fail grade scheme.
- Calculated – for when you want a cumulative total across multiple grade items.
- Text – best to use when entering comments in the gradebook.
- Enter a Name for the item.
(Optional) Enter a short name for your view only to abbreviate the item. - If the grade item belongs to a category, choose the Category from the drop-down menu or create a New Category.
- Enter the Maximum Points a student can earn for this item.
- If using a “Weighted” grading scale, also enter the weight for this item. Note that this option will be grayed out if a category was chosen that is set to distribute the weight evenly or by points.
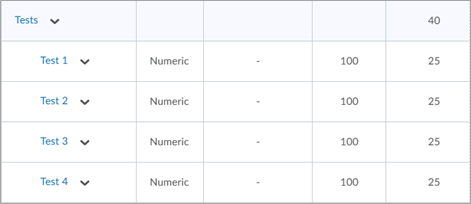
- Please keep in mind that all items within a category must sum to 100% for the category.
- In the following example, the “Tests” category is worth 40% of the course grade.
- With four tests within the “Tests” category, each individual test is worth 25%.
- If using a “Weighted” grading scale, also enter the weight for this item. Note that this option will be grayed out if a category was chosen that is set to distribute the weight evenly or by points.
- (Optional) Select the following options if they are needed for this specific grade item.
- Can Exceed – check this option if a student can earn more than the maximum points.
- Bonus – check this option if this grade item is for extra credit.
- Exclude from Final Grade Calculation – check this option if this grade item should not be utilized in the calculation for the course grade.
- (Optional) Adjust the grade scheme to be utilized. For the majority of the time, the default (percentage) grade scheme is what is needed.
- (Optional) Add a D2L rubric to the grade item.
- (Optional) Adjust the display options of this specific grade item for the students and/or yourself. For the majority of the time, the default display settings are utilized.
- Click the blue Save and Close button to finish creating the grade item.
(Repeat this process if additional grade items are needed.)
How to create a grade category
Categories are used to group grade items (columns) together. Example categories would be: Tests, Assignments, Homework, Project, etc.
![]() How to create a grade category
How to create a grade category
- If you have just finished completing the Setup Wizard, click the link to Create a New Grade Item.
– OR –
Within the Grades area, click the option Manage Grades, then select the blue New button and choose Item. - Enter a Name for the category.
(Optionally) Enter a short name for your view only to abbreviate the category. - If using a Weighted grading scaled, enter the Weight (Percentage) for this category.
(For example, if Tests are 40% of your course grade, enter “40” for the Tests category.) - Distribution:
- If using the “Points” grading scale, selecting the option Distribute points across all items will allow you to designate the Points per item.
- This will also allow enable the option to drop the highest or lowest grade item within the category. Simply enter the number of grade items to drop (for example, enter a “1” to drop only one lowest non-bonus grade item.”
- This will also allow enable the option to drop the highest or lowest grade item within the category. Simply enter the number of grade items to drop (for example, enter a “1” to drop only one lowest non-bonus grade item.”
- If using the “Weighted” grading scale, determine how the weights for each grade item within the category will be distributed: Manually, By Points, or Weight Evenly.
- If the option to Distribute weight evenly across all items is chosen, you also have the option to drop the highest or lowest grade item within the category. Simply enter the number of grade items to drop (for example, enter a “1” to drop only one lowest non-bonus grade item.”
- If the option to Distribute weight evenly across all items is chosen, you also have the option to drop the highest or lowest grade item within the category. Simply enter the number of grade items to drop (for example, enter a “1” to drop only one lowest non-bonus grade item.”
- If using the “Points” grading scale, selecting the option Distribute points across all items will allow you to designate the Points per item.
- Click the blue Save and Close button to finish creating the category.
(Repeat this process if additional categories are needed.)