![]() Use the Content tool to post and organize course content so that information about course expectations, course syllabus, lecture notes, and important dates display to users clearly. Course materials you post in Content can include documents, images, media files, presentations, URL links, and existing course activities (such as assignments, discussions, and quizzes).
Use the Content tool to post and organize course content so that information about course expectations, course syllabus, lecture notes, and important dates display to users clearly. Course materials you post in Content can include documents, images, media files, presentations, URL links, and existing course activities (such as assignments, discussions, and quizzes).
How to add a content module
-
In your D2L course, click on Course Materials and select Content.
-
Under the “Table of Contents” area on the left side of the screen, click on Add a Module…
-
Type a name for the module (e.g. Module 1, Chapter 7 or Week Three) and then press the Enter (or Return) key on your keyboard.
-
The module will be created. Optionally, set the following settings for the new module:
-
add date restrictions. Start and End dates will determine when the module is visible to students.
-
create a release condition. Release conditions determine if an action needs to take place before this module can be visible to students. (i.e. Module 1 quiz needs to be completed before Module 2 becomes available.)
-
add a description for the module to aid students in understanding the content or assignments you have included.
-
-
(Optionally) You can use the Add a sub-module… button at the bottom of the module to nest a module within a module. Use the same steps as above to create the sub-module.


How to delete a module
Note: Deleting a module deletes all topics within that module.
-
On the navbar, click on Course Materials and select Content.
-
In the Table of Contents panel, click the module or topic you want to delete.
-
If you are deleting a module, click Delete Module from the module's context menu. If you are deleting a topic, click Delete Topic from the topic's context menu.
-
Decide whether you want to remove the module or topic from the Content view only or permanently delete the module or topic from the course (this will also delete all associated objects including discussions, quizzes, etc).
-
Click Delete.
Add availability and due dates in Content
Start and end dates specify when learners can access a topic or module. If you set a start, end, or due date for a topic or module, it will appear on the Upcoming Events page and the Agenda view in the Calendar tool. Setting an end date later than the due date for a topic enables learners to access and complete the topic from the Overdue tab on the Course Schedule page. Topics with a due date and no end date also appear in the Overdue tab on the Course Schedule page.
Note: Adding a due date to a content item that is associated to an assignment overrides an existing end date that is further in the future. The due date also overrides the end date in the Calendar tool.
-
On the navbar, click Course Materials and select Content.
-
On the Table of Contents page, click Bulk Edit.
-
For any topic or module that you want to add availability or due dates to, click Add dates and restrictions.
-
Do any of the following:
-
To add a start date, click Add start date. Enter your start date details.
-
To add a due date, click Add due date. Enter your due date details.
-
To add an end date, click Add end date. Enter your end date details.
-
-
Click Update.
-
Click Done Editing.
Files can be shared with students by being uploaded to the Content area. These files can be Word documents (.doc, .docx), PowerPoint files (.ppt, .pptx), and/or .PDF files.
How to upload file to a content module
-
In your D2L course, click on Course Materials and select Content.
-
Click on the content module where you want to add the file.
-
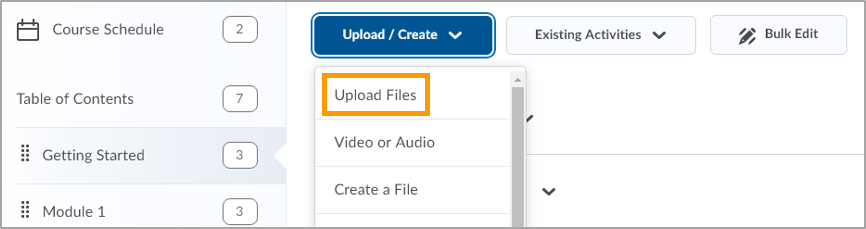
Click the blue Upload/Create button.
-
Choose whether you’re uploading a file from My Computer or Course Offering Files (if it has been uploaded to this D2L course before).
-
Click the Upload button to locate the file OR drag the file to the dotted rectangle.
-
When you see the filename listed within the "Add a File" window, click the blue Add button.
Files can be shared with students by being uploaded to the Content area. These files can be Word documents (.doc, .docx), PowerPoint files (.ppt, .pptx), and/or .PDF files.
How to create a file for a content module
Webpage files can be created within the Content area.
- In your D2L course, go to the content module where you want to add the file.
- Click on Content on the course navigation (navbar).
- Click on the content module name or click on “Add a Module…” to create a new content module.
- Click the blue Upload/Create button.
- Choose the Create a File option from the drop-down menu.
-
Click the blue Upload/Create button.
-
Choose whether you’re uploading a file from My Computer or Course Offering Files (if it has been uploaded to this D2L course before).
-
Click the Upload button to locate the file OR drag the file to the dotted rectangle.
-
When you see the filename listed within the "Add a File" window, click the blue Add button.